Everything you want to know about potting a columnar cactus like Echinopsis pachanoi (San Pedro), Carnegia gigantea (Saguaro) or Echinopsis peruvianus (Peruvian Torch).
What type of pot to use
The cactus community has an ongoing debate over what post is best for our spiky friends: Terracotta, Glazed or Plastic. Here’s a quick summary of the debate:
Terracotta
-
The pros are that it looks great, is relatively cheap, has a “wicking” quality that assists with drainage and is good for the environment.
-
The cons are that it is heavy, especially when watered, and fragile. In summer/very hot places (like most of Australia), the wicking quality isn’t actually ideal, and in the sun, the pot gets hot, which can burn roots.
Glazed or “sealed” terracotta
-
The pros are that it looks great, doesn’t wick, which is mostly a pro in Australia, there is a wide range of colours and shapes to choose from, and it is good for the environment.
-
The cons are that it is heavy, quite expensive, and fragile, and in the sun, the pot can get hot, which can burn roots.
Plastic
-
The pros are that they are considerably cheaper, don’t weigh much, which makes them suitable for shelves, don’t wick, which is mostly a pro in Australia, there is a wide range of colours and shapes to choose from, and it is easy to add more drainage if needed.
-
The cons are that it is not as attractive as other options and not as good for the environment.
The consensus: Unless you live in an unusually cold part of Australia, we recommend avoiding Terracotta due to its wicking qualities. Glazed or “sealed” terracotta are good options if they are within your budget, but plastic works fine, too.
Despite their differences, everyone can agree on one thing—your pot absolutely needs to have good drainage, i.e., holes on the bottom.
What size of pot to use
Ideally, we want a pot in which your cactus will be happy for at least 2 growing seasons/years. Cactus are incredibly tough plants, but their weakness lies beneath the surface in their root systems. No matter how careful you are, whenever you repot a plant, you will damage/shock its roots. This is particularly upsetting for cacti, so we want to keep repotting to a minimum over its lifetime whilst still having it in a pot that is not too large for it.
Width
Our cactus cuttings are taken from large, mature plants and are, therefore, quite thick compared to seed-grown plants of a similar height. We also recommend the use of large rocks in the pot, which we will explain in the next section, so for that reason, we usually recommend quite a large pot with at least 10cm of space on all sides of the cactus, preferably 15cm. Considering the cactus’s width is usually around 10-15cm, a pot about 30-40cm wide would be suitable. You may want to use a 50cm wide pot for our large cuttings.
Height
Try to find a pot roughly the same height as its width. It can be a little different but try to avoid very deep or shallow pots. Tall pots can create drainage issues, and there is an unnecessary amount of soil to use. Shallow pots will become root-bound too quickly, which we’d like to avoid.
Using Structural Rocks in Your Pot
You’ve got your rooted cactus, your pot of choice and your homemade cactus soil mixture. Great, it’s time to pot up! But first, let’s go find a couple of nice rocks.
Most people know that cacti grow in rocky areas, but did you know that it’s because they actually eat the rocks?
Well, sort of. They have a symbiotic relationship with bacteria that live on their roots, which break down the rocks into essential minerals and trade them with the cactus through its roots for water. Pretty neat, huh?
They also use large rocks like anchors, wrapping their roots around them so they don’t tip in strong winds.
While simulating this in a potted environment isn’t absolutely necessary, doing so will promote exceptionally good root growth, which is the most important thing for healthy cacti. It also looks great!
We have touched on this before in Cactus Soil 101, but a great resource for learning more about it is The Stone Eaters.
What Kind Of Rocks to Use
You want to try and find 2 or 3 rocks the size of a child’s fist.
Most rock types will work for this purpose as long as they are coarse and not smooth, so there are no river rocks. Don’t take rocks from the beach as they will be full of salt.
Sandstone is a great option but can be hard to come by, avoid limestone as it alters the soil PH. The most common garden “rock” would be basalt or granite – these are perfect.
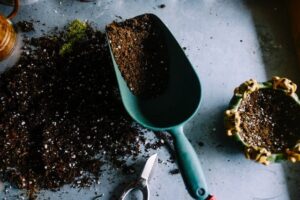
How To Pot Like a Pro
What You’ll Need:
-
Gloves;
-
A suitable pot;
-
2-3 long, flat rocks.
Potting Instructions
-
Fill your pot with damp (not soaking) cactus soil, about halfway or to the depth that you want the bottom of your rooted cactus cutting to be;
-
Take your rocks and chuck them in the pot; we like to place them in such a way that they will add support to our cutting when planted;
-
Carefully remove your rooted cactus cutting from the pot it was rooting in and place it between the rocks;
-
Fill the remaining space in the pot with damp cactus soil;
-
Lightly flatten the top of the soil, but avoid pushing down too much. You don’t want to compact the soil and make it difficult for the roots to adjust to the new, already denser medium;
-
Do not water in the cactus; if you use damp soil, there will be enough moisture. Additional watering will compact the soil too much;
-
Place the cactus back in the partly shaded position it was rooting;
-
Leave it to settle into its new home for a week or two before moving into a full-sun position.